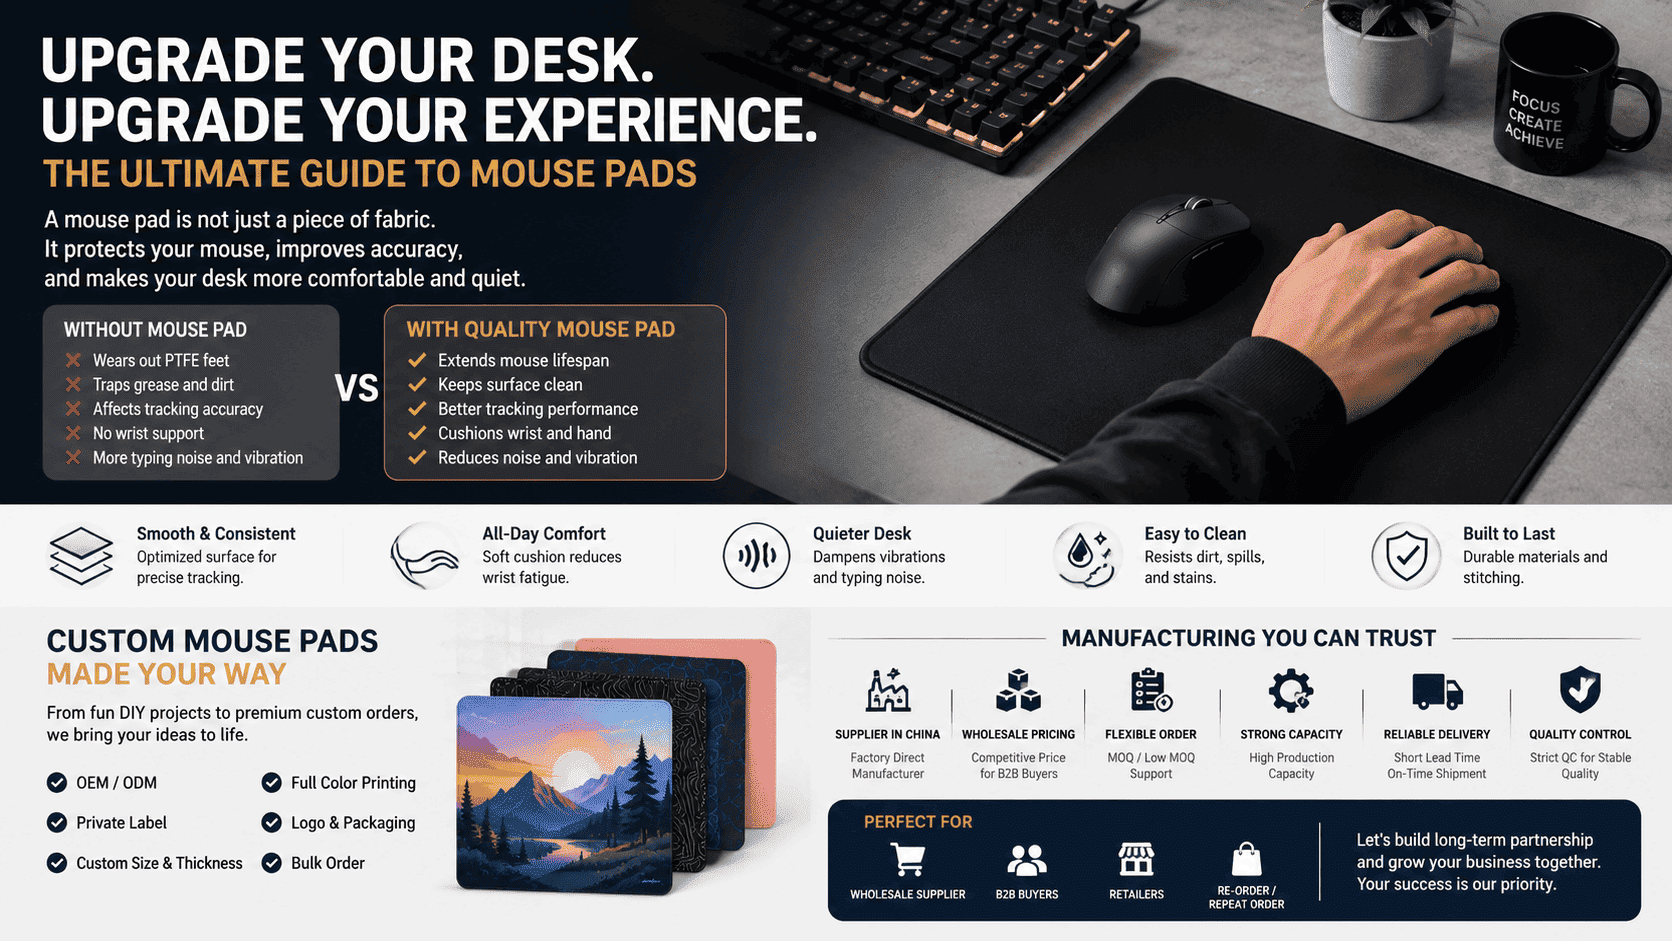
How many of us spend hours at our computers every day, using a cheap dollar-store mouse pad, or worse, dragging our mouse across a bare desk?
Here’s the truth: a mouse pad is not just a piece of decorative fabric. Running a mouse directly on a desktop wears out its PTFE feet, traps grease and dirt, and ultimately messes with the sensor’s tracking accuracy. On top of that, a well-engineered surface cushions your wrist, cuts down on typing vibrations, and dampens desktop noise.
Whether you want a fun weekend DIY project or a premium custom mouse pad, this guide breaks down the materials, physics, and manufacturing secrets in plain English so you can get the best desk experience.
1. The Anatomy of a Mouse Pad: Surface & Base
Surface Type: Are You Team “Speed” or Team “Control”?
In the gaming and tech community, gaming mouse pads generally fall into two categories: control pads (rougher textures for high friction and precise stopping power, ideal for FPS games) and speed pads (ultra-smooth surfaces for quick glides).
-
Standard Cloth Surface (Cloth mouse pad): Usually made of polyester blends. They offer the best value but might feel a bit “dry” or slow out of the box—give them 2 to 3 days to break in. They typically last 12 to 18 months.
-
Micro-Woven Fabric: Woven extremely tight. This texture provides highly consistent feedback and pixel-perfect tracking. It is a staple for competitive gaming pads (like the legendary SteelSeries QcK series) and lasts 2 to 3 years.
-
Premium & Heavy-Duty Fabrics: This includes high-performance options like Cordura mouse pads or Jacquard fabric. They are incredibly durable, scratch-resistant, and water-repellent (spilled drinks wipe right off), offering a great hybrid mouse pad experience.
-
Hard Surfaces: These include glass mouse pads (tempered glass with a frosted finish), aluminum, or premium PU leather desk mats. Glass and metal surfaces offer the ultimate speed experience with almost zero friction, while leather looks elegant and professional for an executive office setup.
⚠️ DIY Buyer Beware: If you are sourcing fabric for a DIY pad, avoid loose cotton, unwashed linen, raw felt, or velvet. These fabrics capture dust, drag on the mouse feet, and cause the optical sensor to stutter.
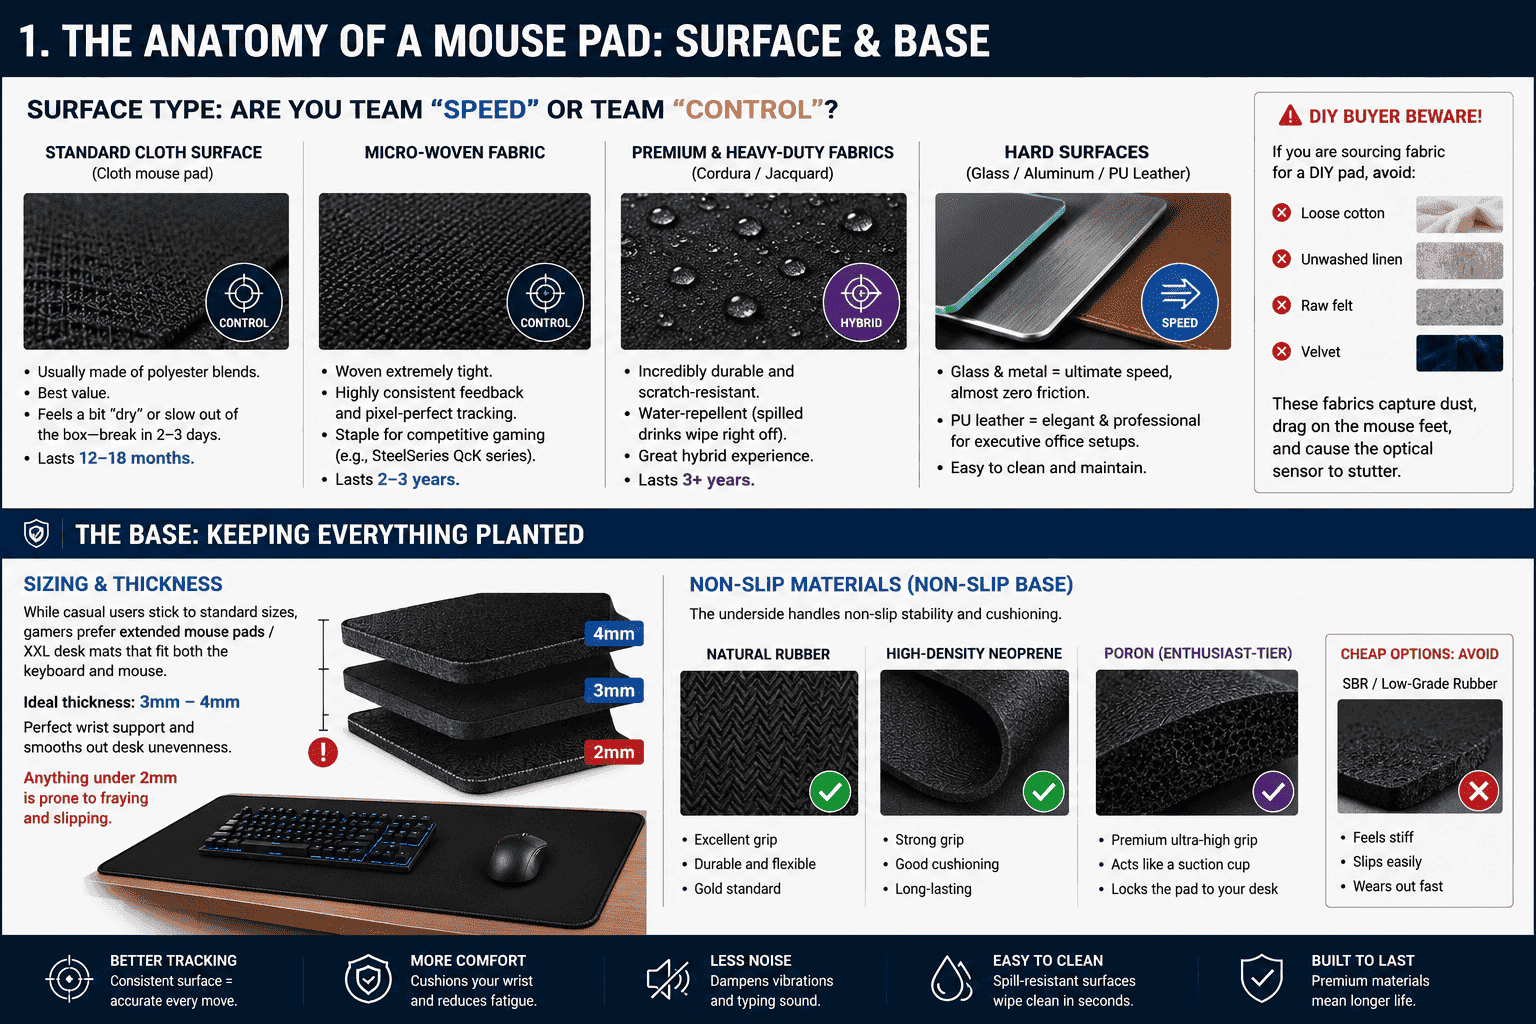
The Base: Keeping Everything Planted
The underside, or the base, handles two critical jobs: non-slip stability and vertical cushioning (thickness).
-
Sizing & Thickness: While casual users stick to standard sizes, gamers prefer extended mouse pads / XXL desk mats that fit both the keyboard and mouse. Look for a thickness of 3mm to 4mm—it offers the perfect amount of wrist support and smooths out desk unevenness. Anything under 2mm is prone to fraying and slipping.
-
Non-Slip Materials (Non-slip base): Natural rubber or high-density neoprene are the gold standards for grip. Cheap synthetic rubbers (like SBR) feel stiff and slide easily. Enthusiast-tier gaming pads use high-end Poron bases, which act like a suction cup to lock the pad to your desk.
2. Three Fun Ways to DIY Your Own Mouse Pad
If you love a good crafting project, you can make a highly functional pad at home using basic tools:
Method A: The Fabric-Fusion Method (Best for: Upcycling old pads)
If you have an old mouse pad with a great rubber base but a stained or ugly surface, give it a skin graft:
-
Buy a sheet of double-sided fusible web/interlining (heat-activated fabric adhesive).
-
Place your chosen fabric face down and align the rough side of the adhesive sheet against the back of the fabric.
-
Set your dry iron to medium heat (no steam!) and press the paper backing for 2 seconds to fuse the glue to the fabric.
-
Peel off the paper backing to reveal the dry adhesive layer now bonded to your fabric.
-
Place the fabric adhesive-side down onto your rubber base.
-
Cover it with a piece of parchment paper to protect the fabric, and press firmly with the iron on medium-high heat for 4 to 6 seconds.
-
Let it cool completely so the adhesive can crystallize, then use a sharp utility knife and a steel ruler to trim the edges perfectly straight.
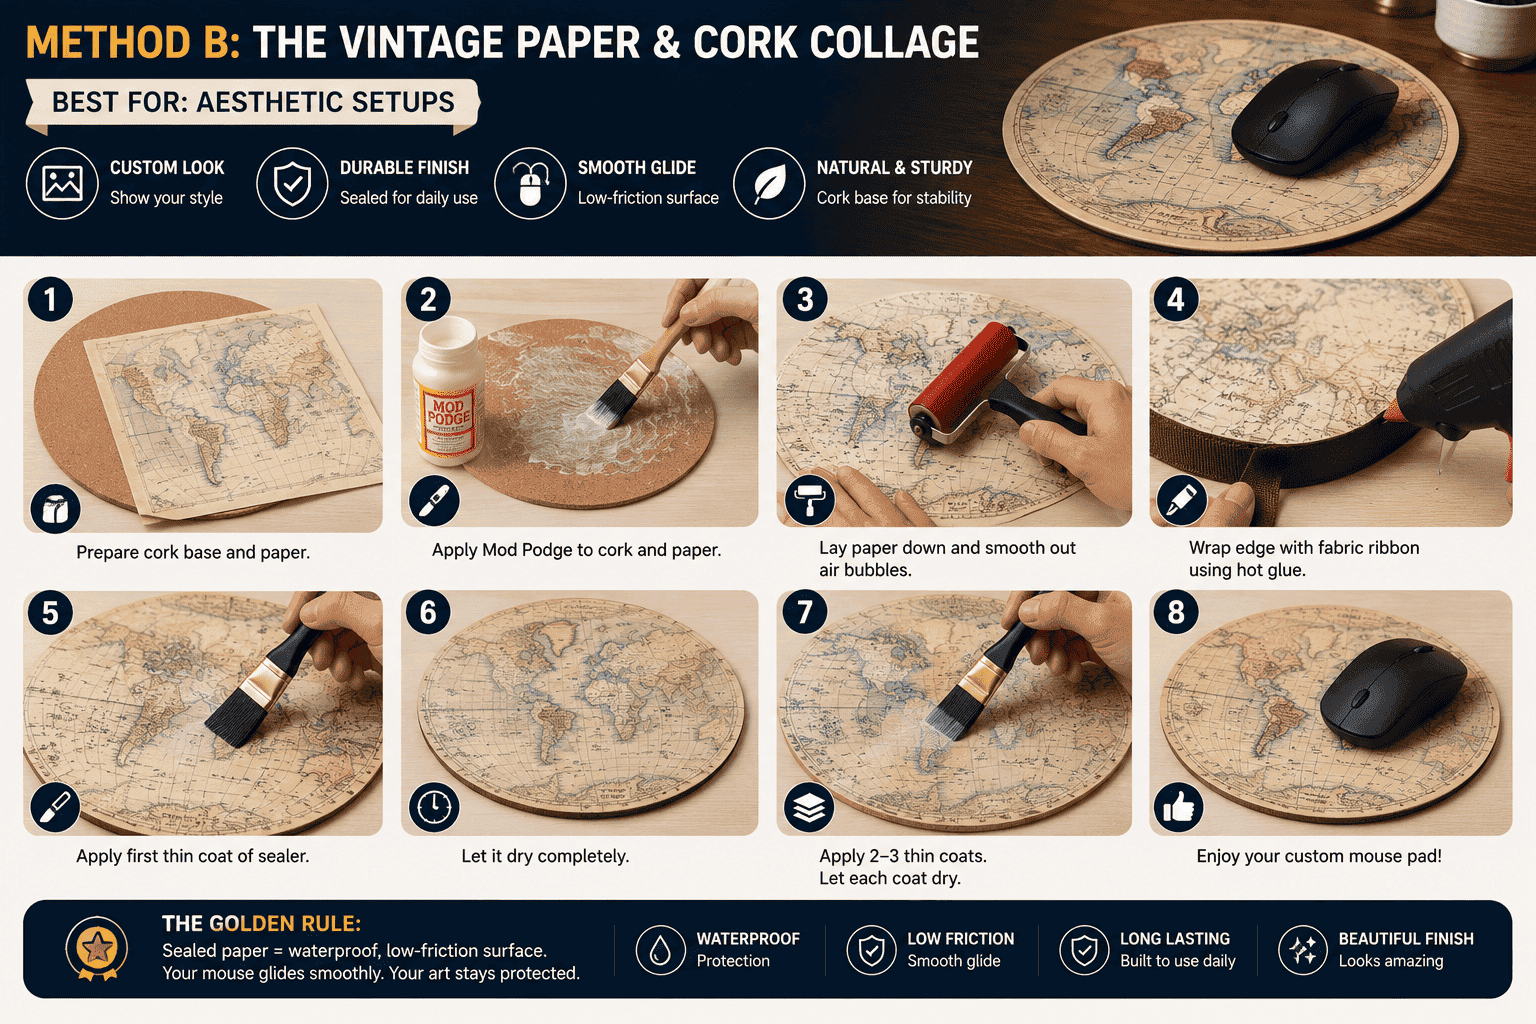
Method B: The Vintage Paper & Cork Collage (Best for: Aesthetic setups)
If you want to turn a vintage map, a cool art print, or photos into a custom desk piece:
-
Grab a round, 7-inch or larger natural cork placemat (heavy cardboard works too, but cork is sturdier).
-
Apply an even layer of matte or gloss Mod Podge to both the cork surface and the back of your paper.
-
Lay the paper down and use a brayer (small roller) or a clean squeegee to smooth it from the center outwards, forcing out all air bubbles.
-
For a clean look, wrap the raw edge of the cork with a fabric ribbon using a hot glue gun.
-
The Golden Rule: Once the paper is dry, apply 2 to 3 extremely thin coats of sealer (like Mod Podge) across the entire top surface. Let each layer dry completely before applying the next. This creates a waterproof, low-friction barrier that lets your mouse glide smoothly.
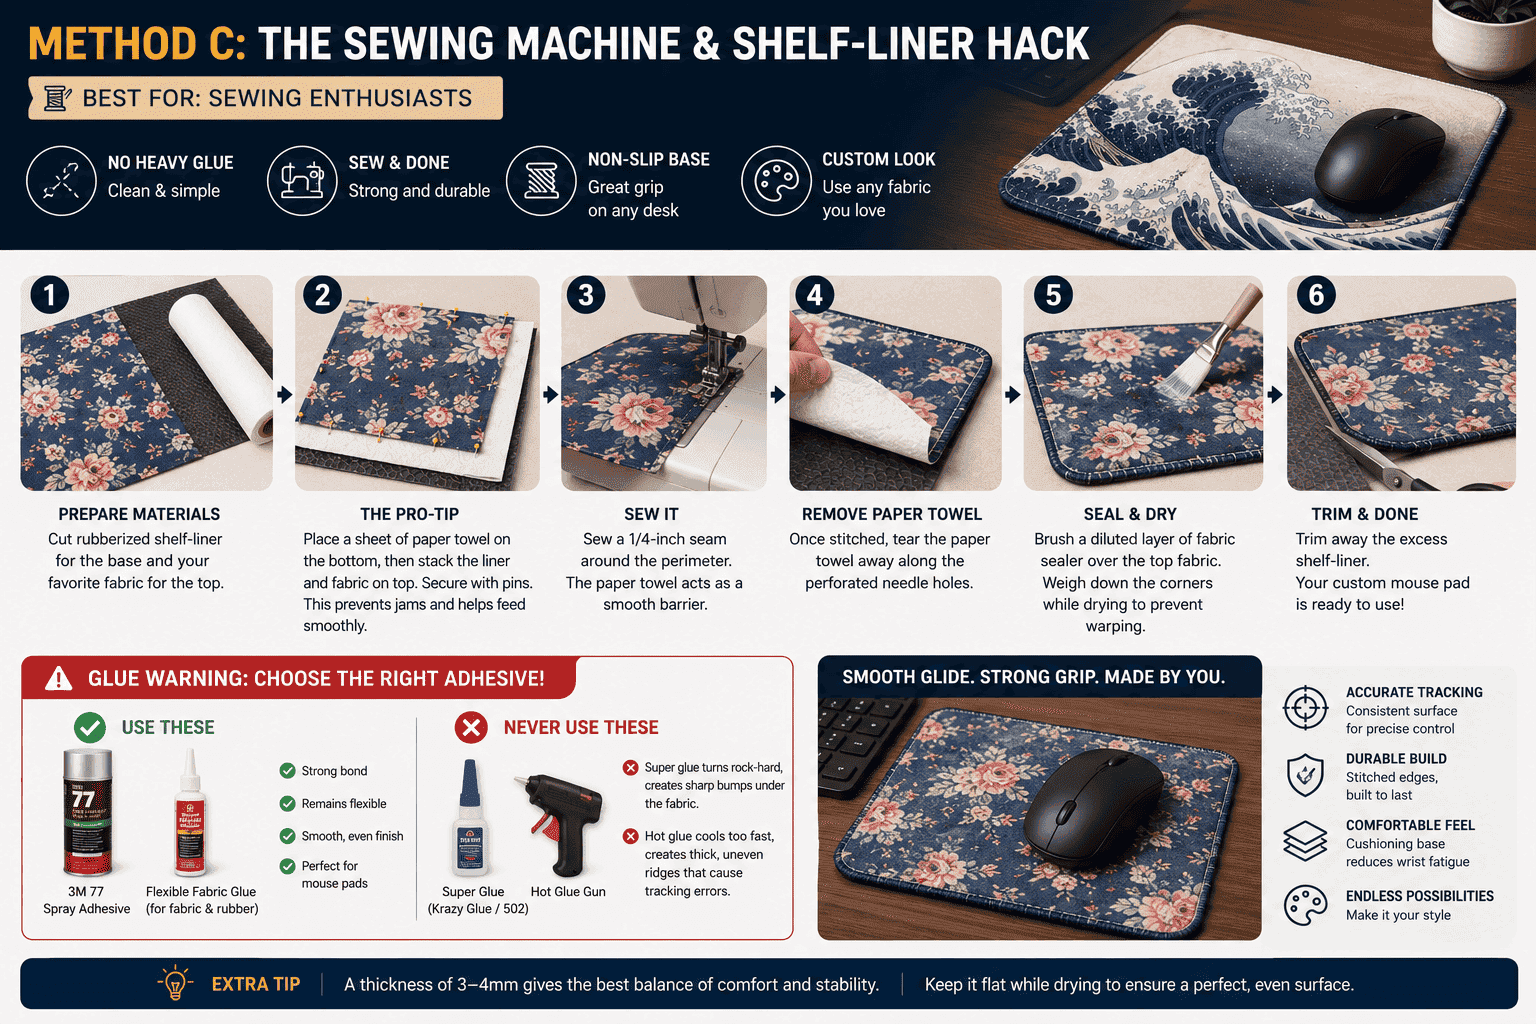
Method C: The Sewing Machine & Shelf-Liner Hack (Best for: Sewing enthusiasts)
If you don’t want to mess with heavy glues, use a sewing machine:
-
Cut a piece of cheap rubberized drawer shelf-liner for the base and your favorite fabric for the top.
-
The Pro-Tip: Because rubber shelf-liners are sticky and elastic, they will jam the sewing machine’s feed dogs. To fix this, place a sheet of standard paper towel on the very bottom, then stack the liner and the fabric on top, securing them with pins.
-
Sew a 1/4-inch seam around the perimeter. The paper towel acts as a smooth barrier, allowing the machine to feed the rubber perfectly.
-
Once stitched, simply tear the paper towel away along the perforated needle holes.
-
Brush a diluted layer of fabric sealer over the top fabric to stiffen the weave, weigh down the corners while drying to prevent warping, and trim away the excess shelf-liner.
Glue Warning: When bonding a mouse pad, stick to 3M 77 spray adhesive or dedicated flexible fabric glues. Never use Super Glue (Krazy Glue/502) or Hot Glue Guns! Super glue cures into rock-hard crystals that feel like sharp bumps under the fabric and crack under pressure. Hot glue cools too quickly, creating thick, uneven “mountain ridges” that cause tracking errors.
3. Dealing with Fraying Edges: How the Factory Does It

Because your forearms constantly rub against the edge of the pad, it is the highest-stress area.
-
Raw Cut: Cheap pads are simply stamped out using lasers or dies with unsealed edges. The fabric usually begins separating from the rubber base within 5 to 6 months.
-
Standard Stitched Edges: This uses a thick overlock stitch around the border. While it prevents fraying, it creates a raised bump that rubs against your wrist and acts like a “wall” if you swipe your mouse to the very edge.
-
Low-Profile Stitching (Sub-Surface): True high-end custom gaming pads use a specialized technique. Before stitching, a machine compresses the edge of the rubber core down by a few microns. The edge is then bound with ultra-fine microfiber threads. The resulting stitch sits flush with or below the surface, giving you zero wrist irritation and an unhindered mouse swipe.
-
DIY Solution: If you are sewing at home, use a flexible bias tape wrapped over the raw edge and run a topstitch 1/8-inch inward for a durable, classic fabric-bound aesthetic.
4. Custom Printing (POD): Getting a Flawless Image
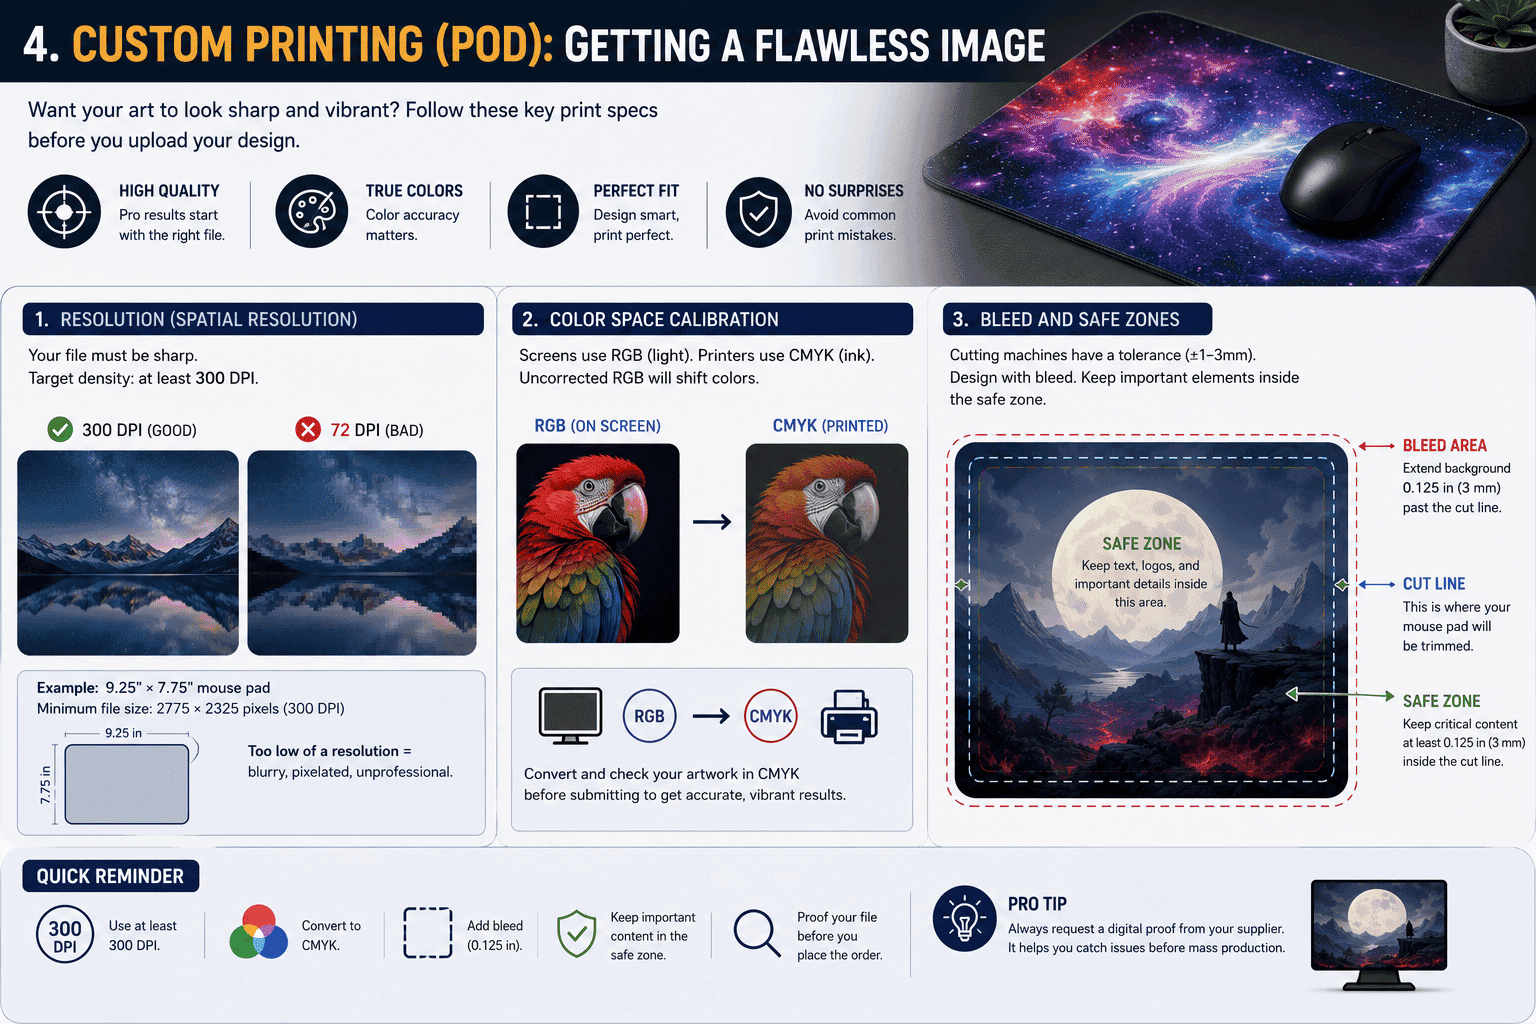
If you want an intricate graphic or an HD wallpaper printed onto your pad, utilizing a custom mouse pad company or an on-demand manufacturer (Print on Demand / POD) is your best bet. Before you upload your artwork, keep these technical print specs in mind:
-
Resolution (Spatial Resolution): Your file must be sharp, with a target density of at least 300 DPI. For example, if you are ordering a standard 9.25″ × 7.75″ mouse pad, your image needs to be at least
2775 × 2325 pixels. Anything lower will result in a blurry, pixelated mess. -
Color Space Calibration: What you see on your phone or monitor uses the RGB color space (light-based), but commercial fabric printers use CMYK (ink-based). When an uncorrected RGB image is converted to CMYK, the colors shift, often making deep blacks look muddy and vibrant saturations look dull. Convert and check your art in CMYK before submitting.
-
Bleed and Safe Zones: Because industrial cutting tools have a slight physical tolerance (±1–3mm), you must design your file with a bleed area—letting your background graphic extend roughly 0.125 inches past the cut lines. Keep text, logos, and critical details inside the safe zone (at least 0.125 inches inside the cutting border) so they don’t get eaten by the stitched edges.
Why does a custom pad cost $5 on one site and $40 on another?
It all comes down to the optimization of the dye sublimation process:
-
The Cheap Method: A factory takes pre-made, mass-produced white blank mouse pads and bakes the artwork onto them at 200°C. The intense heat and heavy pressure cause the pre-cut rubber base to shrink unevenly, and it melts the top polyester layer into a flat, plasticized glaze. This ruins the original weave of the cloth and leaves a uniform, slippery feel.
-
The Premium Method: High-end brands print the artwork directly onto raw fabric rolls first. After the fabric cools, degasses, and regains its native micro-texture, it is cold-laminated onto the rubber base, laser-cut, and finished with a low-profile stitch. This preserves the deliberate control or speed properties of the weave, justifying the higher price point.
Conclusion: Which Route Is Best for You?
Here is a quick summary to help you choose your ideal manufacturing path:
| Manufacturing Path | Lifespan | Estimated Budget | Core English Tag | Best Suited For |
| DIY Fabric-Fusion | 6–12 months | $5 – $15 | DIY Fabric Pad | Crafters, upcycling old gear |
| DIY Cork Paper Collage | 3–6 months | $3 – $8 | Cork Desk Mat | Desk aesthetics, casual office use |
| Budget Industrial Pad | 12–18 months | $8 – $15 | Standard Cloth (Raw Cut) | Temporary fix, light office work |
| Mid-Tier Custom Pad | 24–36 months | $15 – $30 | Custom Stitched Gaming Pad | Gamers, mainstream POD printing |
| Enthusiast OEM Pad | 36+ months | $30 – $60+ | Premium Poron/Glass Pad | Competitive players, gear enthusiasts |
Whether you want to enjoy a quick weekend DIY project or invest in a premium, long-lasting custom battle mat, matching the right surface weave to a proper base cushioning is the secret to a happy wrist and an accurate mouse.
What kind of pad are you rocking on your desk right now? Are you going to try your hand at a custom DIY build, or place an order with a professional print shop? Let me know in the comments below!